Solar energy in high demand now every house hold wants to own it but due to lack of knowledge, awareness and lack luster support of government. Customer always face difficulty in buying this product and even installations. Many engineer, home buyers and electricians buy the product but they also don’t even know how to install it properly.
Step 1: Know the Rooftop Space
Step 2: Creation of mounted Structure
Step 3: Joint Connection of each solar Panel
Step 4: Connection of Inverter with Battery
Step 5: Connection of Solar Panels with Inverter and Grid
In this article, we would highlight top 10 steps that you have to follow for proper installations of solar off grid systems:

1. Solar Panels
2. Solar Structure
3. DC Wire
4. Solar Inverter
5. Solar Battery
Step 1: Know the Solar Roof Space

How much area is required for 1 kW solar panels?
It is important to know the available rooftop space to install solar panels otherwise you may choose wrong size solar panel. It will be also difficult if you buy more solar panels, having less space than required for solar panels.
Solar Panels is available in market in various size from small 10 watt to large size 335 watt. You will buy it basis your requirement and benefits from the product.
Thumb Rule: If you have less space, you need more power then you should buy small size panels in large quantity and if you have large space available then you should buy large size panels in small quantity to fulfill your requirements.
Step 2: Creation of Mounting Structure
There are five types of mounting structure:
- Roof mounted racks
- Ground mounted racks
- Top of Pole mounted racks
- Side of pole mounted racks
- Tracking system mounted racks
Usually, Roof mounted structure is more popular among residential buyers as it is structured on their own roof which is readily available. During creation of mounted structure, you should keep in mind south facing area where you get more sun light during the day where there should not any shading.
What are the components required for mounted structure?
1. XR Rails

2. Clamps

3. Additional Components

1. Standoffs
2. Slotted L-feet
3. Tilt-Legs
4. Adjustable Tilt legs
5. End Clamps
6. T-bolt lugs
7. End caps
8. Wire Clips
Step 3: Joint Connection of Each Solar Panels

Backside of poly crystalline solar panels
Connect the solar panels with wire as parallel or in series connection as per requirement. Connection should be tight and there should not any loose wiring else it impacts efficiency of Solar panels. During bad weather conditions, there is chances of short circuit so you should not compromise on bad quality wiring.
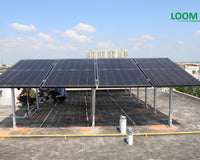
After installations it should look like as given below, all the pillars are filled with solid concrete so it should provide safety to mounted structures.

Solar Panels Structure
Step 4: Connection of Inverter with Battery

Battery Connection
Step 5: connection of Solar Panel with Inverter and Grid

Connection diagram of off grid system
For ordinary household, It may take some times to understand all of the above, but believe me, it is very simple to install solar panel at your roof. It gives pleasure and excitement once you use solar energy, you can run all appliance of your home like TV, led bulb, ceiling fans, water pumps etc. Solar technology innovated many decades ago but we are using it now with full efficiency. This generation is fortune that we have got such kind of alternate energy as Solar.